
Introduction
I thought it might be cool to share some of the things I’ve been working on so far. This article is the first in the series where I try to break silos and integrate my systems into a single domain.
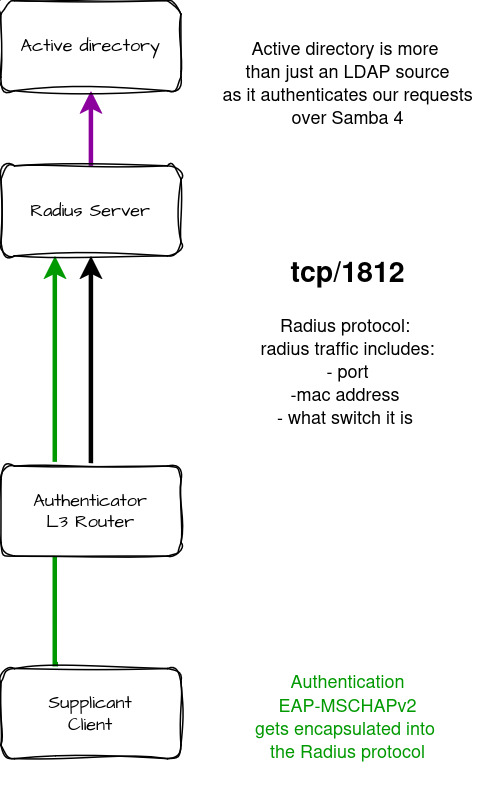
In this write up we’ll use kerberos, freeradius, windows active directory, samba 4.17 and a 802.1X compatible switches to take us one step towards our single sign on journey. The objective is for Windows clients to be able to use their active directory credentials to log into the wifi network.
How it works
I thought it would be useful to start off with a birdseye view of the steps needed to achieve this integration. The process is far from trivial and goes as follows:
- Windows clients list the available wifi connections, choose the right AP and input their username/password
- The tcp packet gets sent out as UDP to the switch
- The switch forwards the EAP-MSCHAPv2 challenge/hash to Freeradius
- FreeRADIUS queries the AD over Samba using the ntlm_auth command
- Samba passes this information to Active Directory to authenticate the user
- Active Directory retrieves the stored password (in NTLM/NT hash format) for that user
- Active Directory compares the MS-CHAP data of the stored password against the submitted password and decides on access
- Active Directory provides (if successful the NT-KEY) and status code back to Samba
- Samba passes that reply to FreeRADIUS through the /var/lib/samba/winbindd_privileged pipe
- FreeRADIUS provides access (or not) to the user
- If it decides to allow access, the post-auth stage is triggered, freeradius then looksup what vlan the user should receive
Configuration
Install the debian packages together with the utils which will be useful to test out our setup later on
1
apt install freeradius freeradius-utils -y
Set a fixed ip address with nmcli, netplan, interfaces or any other method Set a hostname for the machine e.g. radius Add the hostname to the /etc/hosts file so that it can always query itself
1
2
3
4

root@radius:$ nano /etc/hosts
10.250.2.32      radius.thekor.eu          radius
(...)
And finally set the domain controller as the machine’s DNS
Configure the access point(s)
It’s pretty simple to set this up on Unifi. Simply create a radius profile in the Settings>Profiles>Radius section by pointing to the right freeradius port and ip.
Then create a new wifi network (say Radius-Test) and make sure to choose the WPA2/WPA3 Entreprise option. Once that’s done a new section will appear called “RADIUS Profile”. You’ll want to choose the profile we created earlier and that’s it.

Configure freeradius
Radius is able to handle multiple protocols and authentication methods thanks to its module based approach. We’ll only need to configure 4 files to make this work. Here’s a summary of the changes:
- configure the secret inside the /etc/freeradius/3.0/clients.conf. I’ve set it up as testing123 in this article
- Allow the right IP or subnets to listen on the radius port udp/1812 in the “/etc/freeradius/sites-enabled/default” file
- Add nltm_auth as an authentication option in these two files: “/etc/freeradius/sites-enabled/default” and “/etc/freeradius/sites-enabled/inner-tunnel”
1
2
3
4
5
authenticate {
    ...
    ntlm_auth
    ...
}
- configure ntlm_auth so that freeradius can query the AD
1
2
3
4
5
6

root@radius:$ nano /etc/freeradius/mods-enabled/ntlm_auth
exec ntlm_auth {
    wait = yes
    program = "/path/to/ntlm_auth --request-nt-key --domain=MYDOMAIN --username=%{mschap:User-Name} --password=%{User-Password}"
}
Configure the other components
Install the required packages
1
2

root@radius:$ apt-get install samba winbind libnss-winbind krb5-user acl
Configure samba as follows. It’s useful to configure logs in case the services are not configured properly
1
2
3
4
5
6
7
8
9
10
11
12
13

root@radius:$ nano /etc/samba/smb.conf
[global]
workgroup = MYDOMAIN
security = ads
winbind use default domain = yes
realm = MYDOMAIN.COM
ntlm auth = mschapv2-and-ntlmv2-only
netbios name = radius
log level = 3
log file = /var/log/samba/%m
max log size = 50
Set up kerberos so that we can join this linux machine to the domain
1
2
3
4
5
6
7
8
9
10
11
12

root@radius:$ nano /etc/samba/smb.conf
[libdefaults]
    default_realm = MYDOMAIN.COM
    dns_lookup_realm = false
    dns_lookup_kdc = true

[realms]
    MYDOMAIN.COM = {
        admin_server = YOUR.FQDN.COM
        kdc = YOUR.FQDN.COM
    }
Authenticate as a domain administrator over kerberos
1
2
root@radius:$ kinit Administrator
Password for Administrator@MYDOMAIN.COM:
Join the machine to the domain
1
root@radius:$ net ads -k join
Restart the services and make sure that they are not throwing any errors. If successul, the machine should appear on the active directory under “Computers”
1
2
3
root@radius:$ service smbd restart
root@radius:$ service nmbd restart
root@radius:$ service winbind restart
You might need to set the right acls or permissions on the share that freeradius will use to receive the hashes
1
2
3
4
root@radius:$ usermod -a -G winbindd_priv freerad
root@radius:$ setfacl -m u:freerad:rx /var/lib/samba/winbindd_privileged/
root@radius:$ chmod 750 -R /var/lib/samba/winbindd_privileged
root@radius:$ chown root:winbindd_priv /var/lib/samba/winbindd_privileged/
Run freeradius on the command line so that we can look at the logs on one terminal
1
root@radius:$ freeradius -fxxl /dev/stdout
We can now simulate a user login and test out our setup from the command line. This command replicates a user authentication request.
1
2
3
4
5
6
7
8
9
10
11
12
13
14
root@radius:$ radtest -t mschap myuser mysupersecretpassword localhost 0 testing123
Sent Access-Request Id 158 from 0.0.0.0:55567 to 127.0.0.1:1812 length 133
	User-Name = "myuser"
	MS-CHAP-Password = "mysupersecretpassword"
	NAS-IP-Address = 10.250.2.32
	NAS-Port = 0
	Message-Authenticator = 0x00
	Cleartext-Password = "mysupersecretpassword"
	MS-CHAP-Challenge = 0xcdd7f737137c90b2
	MS-CHAP-Response = 0x000100000000000000000000000000000000000000000000000044a8aaaf8b65e43e5129c4c5f019c46b350994ab7738740a
Received Access-Accept Id 158 from 127.0.0.1:1812 to 127.0.0.1:55567 length 84
	MS-CHAP-MPPE-Keys = 0x00000000000000007be213af29f9d4582347561e873ce995
	MS-MPPE-Encryption-Policy = Encryption-Allowed
	MS-MPPE-Encryption-Types = RC4-40or128-bit-Allowed
In the command above you can see that the request returned an “Access-Accept” which means everything went well. We can confirm this by querying the standard output STDOUT from the previous command like so:
1
2
root@radius:$ echo $?
0