
Introduction
It’s time to upgrade my homelab’s identity and access management process. Not that I absolutely needed to but after stumbling upon ayedo’s docs and judging by last week’s headline I’m pretty sure I should have been doing this from the very start of the project.
For now I’ve tied the secrets to my kubespray release which is not bad for a one man show or a homelab but as soon as it grows so will the complexity and the compliance needs. Hashicorp’s vault answers all of those needs by providing a centralized database to host dynamic secrets with more fine grained access control and would avoid the operational risk of committing ansible’s password vault in the clear on my git repo.
For my specific setup with kubernetes the advantages are numerous and especially the advantages that pertain to those pesky CI/CD builds that always needs tons of security exceptions and permissions to run. Instead of having to upload the master password of your vault into gitlab you can 1) ditch passwords alltogether by using the vault’s OIDC 2) avoid having to read and inject multiple secrets like container registry credentials, kube configs and database urls in a gitlab runner 3) you don’t need to create a kube config for your service account anymore 4) have advanced capabilities like rotating secrets instantly in case of a leak 5) and audit, you can see who or what read what secret at any point in time.
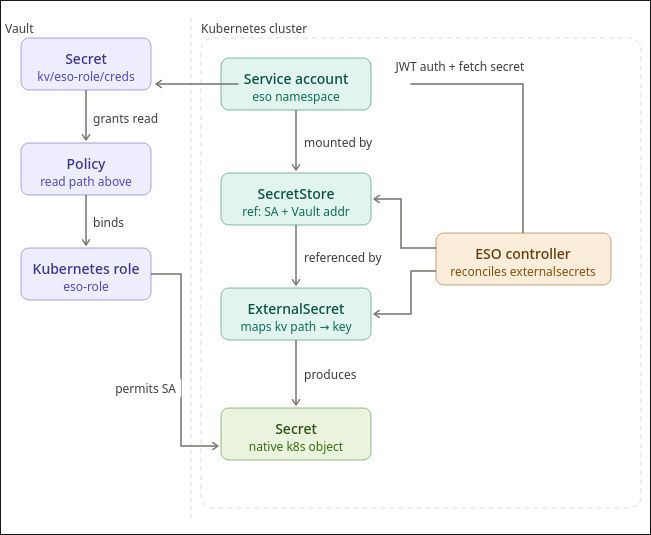
As a big picture overview this is how the operator will keep the secrets in sync with the vault:
In this article we’ll go over:
- How to bootstrap vault as an HA cluster
- Unseal the vault
- Debugging with the CLI
- Creating the ClusterSecretStore + a test role for a test app
- How I’ll be migrating my ansible-vault to hashicorp’s
1. How to bootstrap vault as an HA cluster
Bootstrapping is pretty straightforward. Get a base values.yml.j2 that you can use with helm and ansible to get it started
2. Unseal the vault
the vault is sealed by default as a security measure. When it’s sealed the API won’t work and no one but root can “unseal” it.
3. Debugging
I won’t use the cli to provision the policies and roles but it’s useful to use it to quickly test if something is working as intended before going to the full scale deployment.
This is how you setup the CLI on fedora
1
2
3
4
5
6
7
sudo dnf install -y dnf-plugins-core
sudo dnf config-manager --add-repo https://rpm.releases.hashicorp.com/fedora/hashicorp.repo
sudo dnf install -y vault
echo "token" > ~/.vault-token
vault status -address=https://vault.example.com
export VAULT_ADDR="https://vault.example.com"
vault status
And these are some useful commands:
1
2
3
4
5
6
7
8
9
10
11
12
13
# the test policy
vault policy list
vault policy read eso-policy

# the test role
vault list auth/kubernetes/role
vault read auth/kubernetes/role/eso-role

vault secrets list
vault secrets read kv

# view auth backends
vault auth list
4. A first test
This is where we finally get to start configuring the vault. We’ll start off by enabling the kv engine and the kubernetes backends. We’ll then seed a test secret, and apply the corresponding policy, role, external secret operator and the cluster’s secret store
5. How I’ll be migrating my ansible-vault to hashicorp’s
Each namespace should have the secrets it needs to function. There are a couple of exceptions to this rule as I start migrating but we won’t go over them now because I’ll have to rethink my playbooks i.e. the wildcard TLS certificate, the docker registry credentials and the database credentials I’m currently replicating with the helper function.
Now for the design choice: 1 service account, 1 operator and 1 role per namespace that syncs secrets to the paths like so:
| Kubernetes SA | Vault Role | Vault Policy | Secrets Access |
|---|---|---|---|
| app1-sa | app1-role | app1-policy | kv/app1/* |
| app2-sa | app2-role | app2-policy | kv/app2/* |
I don’t think it makes sense for me to segment the Secret store and the controller per namespace so I’ll go with this approach for now.