
Introduction
Last week we looked at how to install and configure kubernetes, this time we’ll see how to deploy a web app with it. There are a lot of concepts to go through and I’m quite new in this field so bear with me.
Install zsh and zsh completion
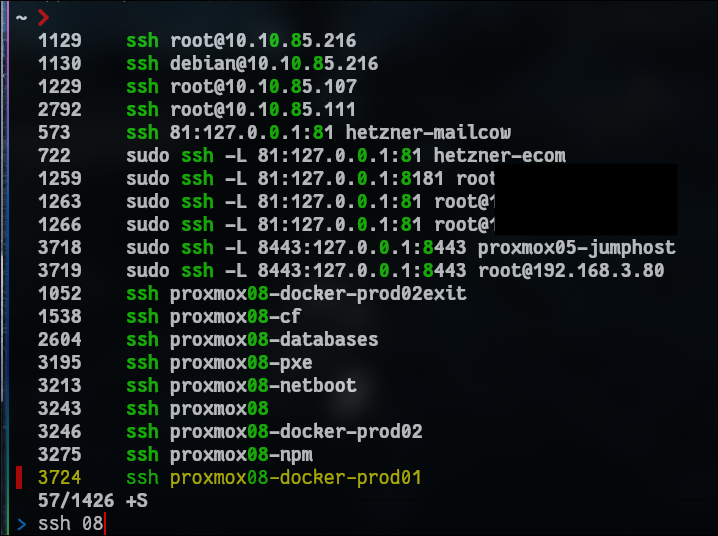
I know this probably doesn’t fit here in any way but I feel i’ve become a true linux fanboy so I’ll just share it anyway. If you work with terminals a lot and want to improve your productivity, I can highly recommend zsh and the fuzzy history finder fzf so I’ll have to set them up on the jumphost before we start frantically typing kubectl commands.
1
2
3
4
5
6
7
8
9
10
11
12
13
14
15
16
17
18
19
20
21
22
23
24
25
26
27
28

root@jumpbox:$ apt update
root@jumpbox:$ apt install zsh

# Make a completions folder
root@jumpbox:$ mkdir -p ~/.zsh/completions

# Generate kubectl completions into it
root@jumpbox:$ kubectl completion zsh > ~/.zsh/completions/_kubec

root@jumpbox:$ apt install fzf
root@jumpbox:$ cat <<'EOF' >> ~/.zshrc

# Enable Zsh completion system
autoload -Uz compinit
compinit

# kubectl completion
source <(kubectl completion zsh)
source <(fzf --zsh)

# If you use alias 'k' for kubectl
alias k=kubectl
compdef __start_kubectl k

EOF

root@jumpbox:$ source ~/.zshrc
If you haven’t tried it yet I can tell you you’re missing out on some huge time savers on the command line. fzf allows you to find previous commands by inputting partial elements. How awesome is that? You can of course use the plain reverse-i-search which is included in bash but it doesn’t match partials.
Namespaces
Every kubernetes component is able to be assigned into a namespace except volumes. Namespaces are useful to assign quotas, permissions and prevent overriding existing deployments because some other team used the same name.
1
root@jumpbox:$ kubectl apply -f mongo-secret.yaml --namespace=other-namespace
or configure your default namespace by running the command below. This avoids wasting time appending –namespace= to all your commands
1
root@jumpbox:$ kubectl config set-context --current --namespace=other-namespace
Setting up a mongo db and a web app
1. The database
The order of creation matters. Before setting up the deployment we need to reference the secret
1
2
3
4
root@jumpbox:$ echo -n 'username' | base64
dXNlcm5hbWU=
root@jumpbox:$ echo -n 'password' | base64
cGFzc3dvcmQ=
and add it to the mongo-secret.yaml
1
2
3
4
5
6
7
8
9
10
11
root@jumpbox:$ nano mongo-secret.yml
apiVersion: v1
kind: Secret
metadata:
    name: mongodb-secret
type: Opaque
data:
    mongo-root-username: dXNlcm5hbWU=
    mongo-root-password: cGFzc3dvcmQ=

root@jumpbox:$ kubectl apply -f mongo-secret.yml
Next we’ll configure the database itself: mongo.yaml and create the service so that I can reference the pod by its service name and do name resolution as opposed to IP addressing.
1
2
3
4
5
6
7
8
9
10
11
12
13
14
15
16
17
18
19
20
21
22
23
24
25
26
27
28
29
30
31
32
33
34
35
36
37
38
39
40
41
42
43
44
45
root@jumpbox:$ nano mongo.yml
apiVersion: apps/v1
kind: Deployment
metadata:
  name: mongodb-deployment
  labels:
    app: mongo
spec:
  replicas: 1
  selector:
    matchLabels:
      app: mongo
  template:
    metadata:
      labels:
        app: mongo
    spec:
      containers:
      - name: mongo
        image: mongo
        ports:
        - containerPort: 27017
        env:
        - name: MONGO_INITDB_ROOT_USERNAME
          valueFrom:
            secretKeyRef:
              name: mongodb-secret
              key: mongo-root-username
        - name: MONGO_INITDB_ROOT_PASSWORD
          valueFrom:
            secretKeyRef:
              name: mongodb-secret
              key: mongo-root-password
---
apiVersion: v1
kind: Service
metadata:
  name: mongodb-service
spec:
  selector:
    app: mongo
  ports:
    - protocol: TCP
      port: 27017
      targetPort: 27017
1
2
3
4
5
6
7
8
9
10
11
12
13
14
root@jumpbox:$ kubectl apply -f mongo.yml
root@jumpbox:$ kubectl get all
NAME                                      READY   STATUS    RESTARTS   AGE
pod/mongodb-deployment-6d9d7c68f6-mhmp7   1/1     Running   0          15m

NAME                      TYPE        CLUSTER-IP   EXTERNAL-IP   PORT(S)     AGE
service/kubernetes        ClusterIP   10.0.0.1     <none>        443/TCP     5d19h
service/mongodb-service   ClusterIP   10.0.0.176   <none>        27017/TCP   20s

NAME                                 READY   UP-TO-DATE   AVAILABLE   AGE
deployment.apps/mongodb-deployment   1/1     1            1           15m

NAME                                            DESIRED   CURRENT   READY   AGE
replicaset.apps/mongodb-deployment-6d9d7c68f6   1         1         1       15m
2. DNS
We deployed a database on the last section and if we try to deploy our web application it will fail because there is no address resolution. Sure you could hard code those in the /etc/hosts files and do name address resolution based on those but let’s see a better way of doing this. If we attached a DNS server and allowed it to talk to our api on the control plane it could automatically discover the addresses he sees.
We will deploy a DNS server on the hostnetwork of each node which we previously configured on our “./configs/kubelet-config.yaml”. Coredns needs permissions to query the k8s api server so the manifest is a bit more complex. It’s easier to let the pods run on the hosts’ network otherwise we’ll have to set up masquerading/NAT to make sure the firewall knows how to reach the pod’s network. By NATing, the worker node replaces the pods’ ip in the outgoing request with its own IP. Without masquerading the firewall would receive a request from the two pod networks (10.200.0.0/24 and 10.200.1.0/24) and not know what to do with them which would result in an error.
1
2
3
4
5
root@jumpbox:$ kubectl apply -f https://raw.githubusercontent.com/hupratt/kubernetes-the-hard-way/refs/heads/v1/kubeconfiguration/2-coredns.yml
root@jumpbox:$ kubectl get pods -n kube-system -o wide
NAME                    READY   STATUS    RESTARTS      AGE   IP            NODE     NOMINATED NODE   READINESS GATES
coredns-f6c46c4-cs6tw   1/1     Running   1 (17m ago)   18m   192.168.3.82   node01   <none>           <none>
coredns-f6c46c4-rvcw5   1/1     Running   3 (17m ago)   18m   192.168.3.83   node02   <none>           <none>
Verify that the reverse PTR records are set properly and that there is internal and external connectivity. We should also of course be able to query the database service: “mongodb-service” by its name without having to manually type anything
1
2
3
4
5
6
7
8
9
10
11
12
13
14
15
16
17
18
19
20
21
22
23
24
25
26
27
28
root@jumpbox:$ kubectl run -it --rm debug --image=infoblox/dnstools --restart=Never --command -- /bin/sh

dnstools# nslookup 10.0.0.1
1.0.0.10.in-addr.arpa	name = kubernetes.default.svc.cluster.local.

dnstools# nslookup kubernetes
Server:		10.0.0.10
Address:	10.0.0.10#53
Name:	kubernetes.default.svc.cluster.local
Address: 10.0.0.1

dnstools# nslookup telekom.de
Server:		10.0.0.10
Address:	10.0.0.10#53
Non-authoritative answer:
Name:	telekom.de
Address: 63.176.75.230
Name:	telekom.de
Address: 3.75.56.200
Name:	telekom.de
Address: 3.67.146.210

dnstools# nslookup mongodb-service
Server:		10.0.0.10
Address:	10.0.0.10#53

Name:	mongodb-service.default.svc.cluster.local
Address: 10.0.0.118
The worker nodes don’t have systemd-resolved managing the DNS. You could therefore edit the /etc/resolv.conf file directly but it should be set via DHCP automatically based on your DHCP server’s configuration. If you decide to opt for the systemd-resolved route however you should not edit the /etc/resolv.conf and would normally use resolvectl or nmcli (NetworkManager) instead
3. The node js application
Now, we can deploy the config map, the service and the correponding application. We could have set up the database url as follows and avoided using a configmap or a service
1
2
3
4
5
(...)
    name: ME_CONFIG_MONGODB_URL
        value: "mongodb://username:password@mongodb-service:27017/admin"

(...)
but it’s good practice to set up our webserver this way instead as it is more resilient and secure:
1
2
3
4
5
6
7
8
9
10
11
12
13
14
15
16
17
18
(...)
    - name: ME_CONFIG_MONGODB_ADMINUSERNAME
      valueFrom:
        secretKeyRef:
          name: mongodb-secret
          key: mongo-root-username
    - name: ME_CONFIG_MONGODB_ADMINPASSWORD
      valueFrom:
        secretKeyRef:
          name: mongodb-secret
          key: mongo-root-password
    - name: ME_CONFIG_MONGODB_SERVER
      valueFrom:
        configMapKeyRef:
          name: mongodb-configmap
          key: database_url

(...)
Set up the config map
1
2
3
4
5
6
7
8
9
10
root@jumpbox:$ nano configmap.yml
apiVersion: v1
kind: ConfigMap
metadata:
  name: mongodb-configmap
data:
  database_url: mongodb-service

root@jumpbox:$ kubectl apply -f configmap.yml
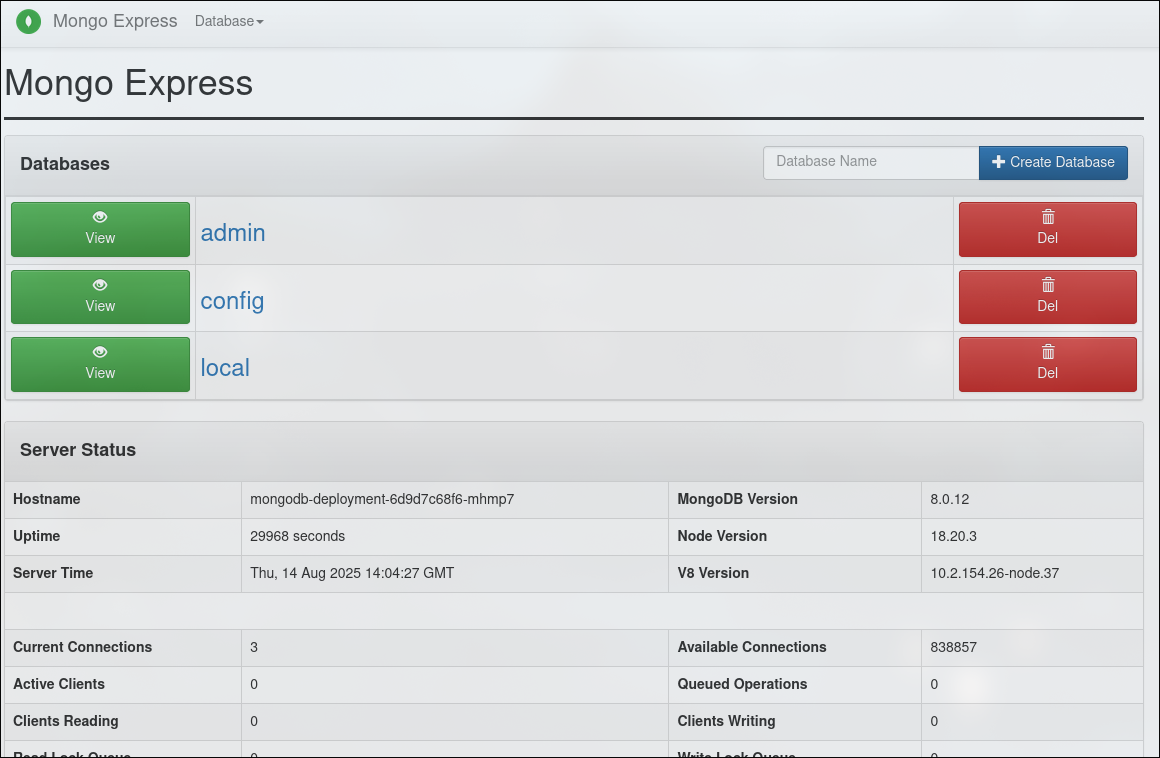
Download the mongo-express.yaml deployment, start the svc+deployment and marvel at our nodejs web server.
1
2
3
4
5
6
7
8
9
10
11
root@jumpbox:$ kubectl apply -f https://raw.githubusercontent.com/hupratt/kubernetes-the-hard-way/refs/heads/v1/kubeconfiguration/3bis-mongo-express.yaml
root@jumpbox:$ curl -I -u admin:pass http://node01:30000
HTTP/1.1 200 OK
X-Powered-By: Express
Content-Type: text/html; charset=utf-8
Content-Length: 9288
ETag: W/"2448-8C4drgtvtNbipbeBY3oLYnSHr/M"
Set-Cookie: mongo-express=s%3AeE8grO3VkJ3EkBCk5ktP9Og3XAPZa9y-.lAKmOY8U4cp0ugY1MD%2BSN447ohkP72iBml7IS9mAQQ0; Path=/; HttpOnly
Date: Thu, 14 Aug 2025 14:06:25 GMT
Connection: keep-alive
Keep-Alive: timeout=5
You should also be able to see it from your computer by browsing to: http://192.168.3.82:30000/
4. Routing
We made our node01 listen on incoming tcp connections on port 30000 on the previous section but what would happen if the pod gets re-scheduled on node02? The solution was a good start to test out the connectivity but we want to persist these changes cluster-wide and be able to access our services with a single domain name. In this section we will explore the concept of an ingress and how to achieve just that. If you’re familiar with apache’s virtual hosts it’s very similar to how our setup will dispatch the right service based on the FQDN.
With an ingress instead of defining a nodePort and a “type: LoadBalancer” to make a service accessible from the outside like we did previously:
1
2
3
4
5
6
7
8
9
10
11
12
13
apiVersion: v1
kind: Service
metadata:
  name: mongo-express-service
spec:
  selector:
    app: mongo-express
  type: LoadBalancer
  ports:
    - protocol: TCP
      port: 8081
      targetPort: 8081
      nodePort: 30000
you can set the service as a “type: ClusterIP” instead and define an ingress that forwards the packets to your internal service. I’ve disabled the haproxy healthchecks on the example below because I couldn’t make it work any other way due to the how the mongo-express docker image handles authentication.
1
2
3
4
5
6
7
8
9
10
11
12
13
14
15
16
17
18
19
20
21
22
apiVersion: networking.k8s.io/v1
kind: Ingress
metadata:
  name: mongo-express-ingress
  namespace: default
  annotations:
    haproxy.org/check: "disabled"
    haproxy.org/backend-config-snippet: |
      no option httpchk
spec:
  ingressClassName: haproxy
  rules:
    - host: mongo-k8s.thekor.eu
      http:
        paths:
          - path: /
            pathType: Prefix
            backend:
              service:
                name: mongo-express-service
                port:
                  number: 8081
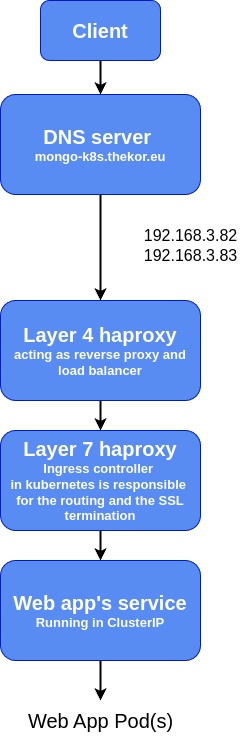
The advantages to using an ingress are for instance that 1) you get cleaner URLs without ports at the end 2) have a centralized point to terminate your SSL connections and renew the certs and 3) we get more possibilities such as rewrite rules, headers, configuring authentication middlewares, ACLs and so on. Here is the process flow that we are planning to setup
For this setup to work however you’ll either have to install the helm chart of our ingress controller from the package manager as it is not included in the barebone k8s package we set up earlier
You can view helm charts as kubernetes manifest files with place holders to dynamically configure the deployments and configuration.
1
2
3
4
5
6
root@jumpbox:$ curl https://baltocdn.com/helm/signing.asc | gpg --dearmor -o /usr/share/keyrings/helm.gpg
root@jumpbox:$ echo "deb [signed-by=/usr/share/keyrings/helm.gpg] https://baltocdn.com/helm/stable/debian/ all main" | tee /etc/apt/sources.list.d/helm-stable-debian.list
root@jumpbox:$ apt update && apt install helm
root@jumpbox:$ helm repo add haproxy-ingress https://haproxy-ingress.github.io/charts
root@jumpbox:$ helm repo update
root@jumpbox:$ helm install haproxy-ingress haproxy-ingress/haproxy-ingress
or simply run this if you don’t have/want to install helm just yet
1
2
3
4
root@jumpbox:$ kubectl apply -f https://raw.githubusercontent.com/hupratt/kubernetes-the-hard-way/refs/heads/v1/kubeconfiguration/4-ingress-controller.yml
root@jumpbox:$ kubectl apply -f https://raw.githubusercontent.com/hupratt/kubernetes-the-hard-way/refs/heads/v1/kubeconfiguration/5-ingress-rbac.yml
root@jumpbox:$ kubectl apply -f https://raw.githubusercontent.com/hupratt/kubernetes-the-hard-way/refs/heads/v1/kubeconfiguration/6-ingress-mongoexpress.yaml
I’ve added the DNS record to my local DNS server with dnsmasq and this is what the http call would look like in case you type: http://mongo-k8s.thekor.eu:8080 on your browser.
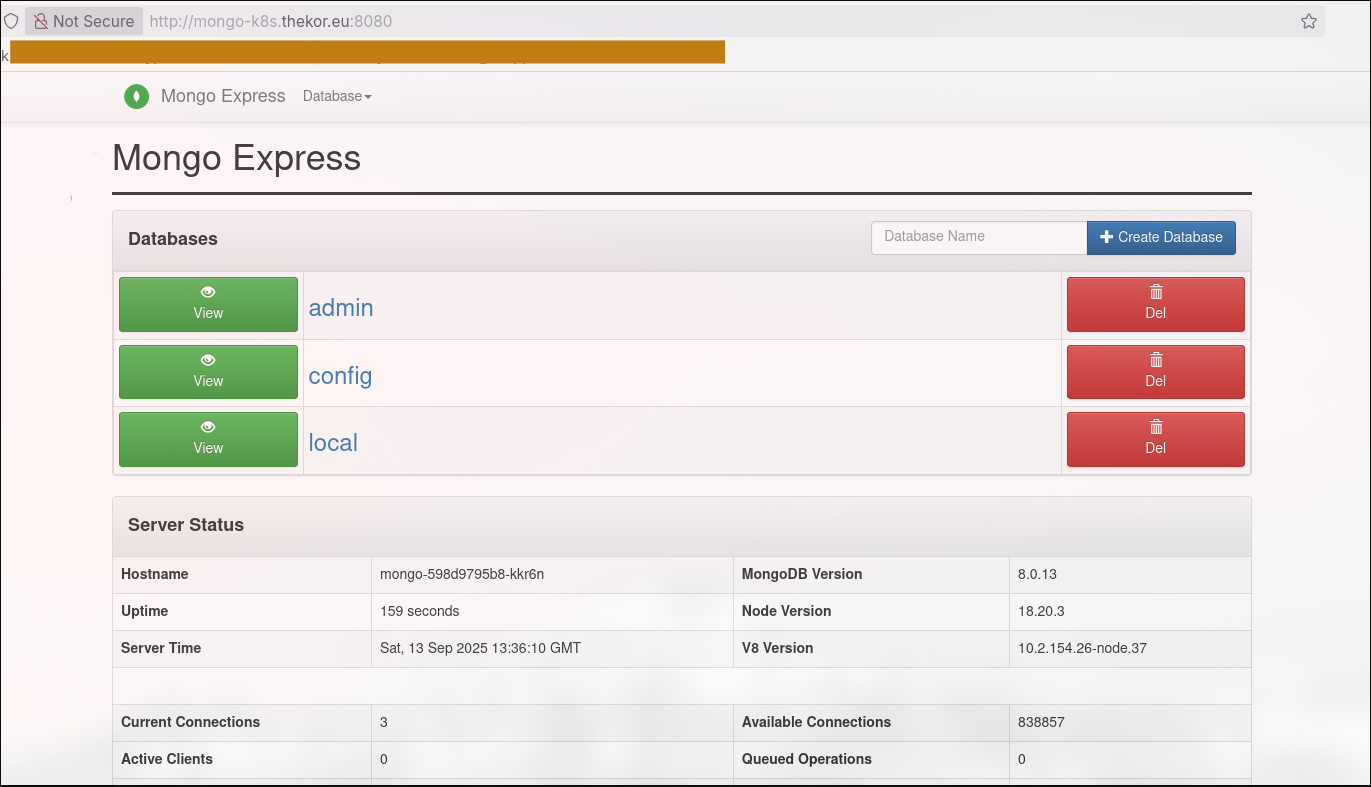
The client goes to the DNS server mongo-k8s.thekor.eu which points to a reverse proxy. The worker node01 or worker node02 forwards it to the ingress controller. The request then gets forwarded to the web app’s svc who forwards it to the pod
I’ve opted for dnsmasq as it allows you to specify 2 ip addresses for 1 A record as we did not setup the “haproxy load balancer” just yet. You can browse this article or my previous article if you want to get it setup.
As a side note, if you have small VMs like me you might consider reducing the memory requirements
1
2
3
4
5
6
7
root@jumpbox:$ kubectl edit deployment haproxy-kubernetes-ingress -n haproxy-controller
resources:
  limits:
    memory: 256 Mi
  requests:
    memory: 128 Mi
as you debug your deployments these are useful commands to remember
1
2
3
4
5
6
7
8
9
10
11
12
13
14
# kills the pods and spawns new ones
root@jumpbox:$ kubectl rollout restart deployment nginx

# follow the nginx deployment logs
root@jumpbox:$ kubectl logs -f deployment/nginx

# this is useful to see where a pod got stuck
root@jumpbox:$ kubectl describe pod nginx-pod

# start a pod to debug DNS
root@jumpbox:$ kubectl run -it --rm debug --image=infoblox/dnstools --restart=Never --command -- /bin/sh

# test reachability within the haproxy ingress
root@jumpbox:$ kubectl exec -it haproxy-ingress-567594f778-6xntr -- curl -u admin:pass -H "Host: mongo-k8s.thekor.eu" http://mongo-express-service:8081/
Conclusion
And we have only scratched the surface of k8s. On the next articles I’ll probably dive into to storage, galera clusters, load balancers and the pros and cons of the available k8s CNI solutions out there.
Cheers