
Introduction
Time to level up this blog and practice what we preach. This article will look at how to deploy this jekyll blog into the proxmox cluster we set up earlier. The blog is currently orchestrated by a simple docker compose stack which usually gets updated by running a git pull && docker compose up -d --build. Instead of doing it that way we will push the docker container into our gitlab registry and let our cluster trigger the pull from gitlab and start the deployment. We already have wildcard certificates created with cert-manager so this should be pretty straightforward.

This is the first stepping stone into actually migrating my whole docker stack into kubernetes.
Preparing for the deployment
Docker image
Building the image is as simple as adding a couple of lines to the docker compose file to point to our gitlab’s container registry
1
2
3
4
5
6
7
8
services:
  jekyll:
    build: .
    restart: unless-stopped
    image: registry.thekor.eu/kube/chirpy:latest
    container_name: chirpy
    ports:
      - "4000:4000"
To trigger the build and send it to the docker repository:
1
2
3
4
5
docker compose build
docker login registry.thekor.eu
docker push registry.thekor.eu/kube/chirpy:latest
# passwords get saved here
cat ~/.docker/config.json
Or create a special release for the occasion:
1
2
3
4
5
6
7
docker tag registry.thekor.eu/kube/chirpy:latest registry.thekor.eu/kube/chirpy:kube
docker image ls
REPOSITORY                                           TAG                                  IMAGE ID       CREATED         SIZE
registry.thekor.eu/kube/chirpy                     kube                                 4c546a7122c2   4 minutes ago   136MB
registry.thekor.eu/kube/chirpy                     latest                               4c546a7122c2   4 minutes ago   136MB
docker login registry.thekor.eu
docker push registry.thekor.eu/kube/chirpy:kube
Gitlab
Gitlab’s config should look like this if you’re running an haproxy reverse proxy to handle the gitlab TLS certificates
1
2
3
4
5
6
7
8
9
10
11
12
13
14
15
16
17
18
19
20
21
22
23
24
25
26
27
28
29
services:
  gitlab:
    image: gitlab/gitlab-ce
    container_name: gitlab
    restart: always
    hostname: 'gitlab.thekor.eu'
    environment:
      GITLAB_OMNIBUS_CONFIG: |
        external_url 'http://gitlab.thekor.eu'
        gitlab_rails['registry_enabled'] = true
        registry_external_url 'https://registry.thekor.eu'
        registry_nginx['listen_https'] = false
        registry_nginx['listen_port'] = '5005'
        registry_nginx['enable'] = true
        registry['enable'] = true
        nginx['redirect_http_to_https'] = false
        nginx['listen_https'] = false
        nginx['listen_port'] = 80
        nginx['proxy_set_headers'] = {
          "X-Forwarded-Proto" => "https",
          "X-Forwarded-Ssl" => "on"
        }
(...)
    ports:
      - '80:80'
      - '443:443'
      - '5005:5005'
      - '2122:22'
(...)
Whether you’re terminating the TLS on gitlab or on the reverse proxy it doesn’t really matter. What does matter is having https otherwise containerd or docker will refuse to pull the image from the registry. Docker allows you to easily drop this security to http with the change below but I couldn’t easily get it to work on the containerd side so I don’t recommend that approach. If you add a new node to your cluster you will also certainly forget to add the containerd configuration which will lead to ackward situations during upgrades or rollouts.
1
2
3
4
nano /etc/docker/daemon.json
{
  "insecure-registries": ["registry.thekor.eu:5005"]
}
Routing
The incoming queries from the internet get masqueraded to the reverse proxy below who either forwards the TCP stream to kubernete’s haproxy reverse proxy (kube-backend backend) who then terminates the SSL connection or forwards to another http reverse proxy (tcp-444-backend backend) that houses my legacy docker stack.
My reverse proxy’s haproxy.cfg looks like this:
1
2
3
4
5
6
7
8
9
10
11
12
13
14
15
16
17
18
19
20
21
22
23
24
25
26
27
28
29
30
31
32
33
34
frontend tcp-443-in
    bind *:443
    mode tcp
    option tcplog
    tcp-request inspect-delay 5s
    tcp-request content accept if { req.ssl_hello_type 1 }

    acl sni_chirpy req.ssl_sni -i chirpy.thekor.eu
    acl is_https req.ssl_sni -i thekor.eu
    use_backend kube-backend if sni_chirpy
    use_backend tcp-444-backend if is_https
    default_backend tcp-444-backend

frontend tcp-2122-in
  mode tcp
  bind *:2122
  default_backend gitlab-backend

backend tcp-444-backend
    mode tcp
    option tcp-check
    server haproxy-legacy haproxy-legacy:444 send-proxy

backend kube-backend
    mode tcp
    balance roundrobin
    option tcp-check
    server kube1 <kube node ip>:8443
    server kube2 <kube node ip>:8443
    server kube3 <kube node ip>:8443

backend gitlab-backend
  mode tcp
  server gitlab-backend <gitlab's ip>:2122
Storage with ceph
Like I said earlier we are currently building upon the proxmox cluster we set up earlier which is using ceph as the distributed storage. We created in that article a storage called “rook-ceph-block” which, as the name suggests, allows us to create block storage for our databases. The use case with our blog today requires us to persist files in a file-based structure. Ceph naturally supports this with its own cephfs implementation but we will have to enable it.
The file system’s name should correspond to your storage classes’ “fsName” and “pool” name
1
2
3
4
5
6
7
8
9
10
11
12
13
14
15
16
17
18
19
20
21
22
23
git clone --single-branch --branch v1.15.3 https://github.com/rook/rook.git
cd rook/deploy/examples
kubectl apply -f csi/cephfs/storageclass.yaml
nano csi/cephfs/storageclass.yaml

apiVersion: storage.k8s.io/v1
kind: StorageClass
metadata:
  name: rook-cephfs
provisioner: rook-ceph.cephfs.csi.ceph.com # csi-provisioner-name
parameters:
  # clusterID is the namespace where the rook cluster is running
  # If you change this namespace, also change the namespace below where the secret namespaces are defined
  clusterID: rook-ceph # namespace:cluster

  # CephFS filesystem name into which the volume shall be created
  fsName: myfs

  # Ceph pool into which the volume shall be created
  # Required for provisionVolume: "true"
  pool: myfs-data0
(...)
Instantiate the class:
1
2
3
4
5
6
7
8
9
10
11
12
13
14
15
16
17
18
cat <<EOF > fs.yaml
apiVersion: ceph.rook.io/v1
kind: CephFilesystem
metadata:
  name: myfs
  namespace: rook-ceph
spec:
  metadataPool:
    replicated:
      size: 3
  dataPools:
    - replicated:
        size: 3
  metadataServer:
    activeCount: 1
    activeStandby: true
EOF
kubectl apply -f fs.yaml
and attach to the toolbox container we created earlier to see it:
1
2
3
4
5
6
7
kubectl -n rook-ceph get cephfilesystem myfs -w
kubectl -n rook-ceph exec -it deploy/rook-ceph-tools -- bash
sh-5.1$ ceph osd pool ls
replicapool
.mgr
myfs-metadata
myfs-data0
The deployment
Now that all the planets are aligned we can trigger the kubernetes deployment and ingress. The blog is requires a docker-secret to pull the image from gitlab, a wildcard certificate for the https connection, the deployment and the ingress:
1
2
3
4
5
6
7
kubectl create namespace chirpy
kubectl create secret docker-registry regcred \
  --docker-server=registry.thekor.eu \
  --docker-username=<secret> \
  --docker-password=<secret> \
  --docker-email=<secret> \
  -n chirpy
You can either copy over the secret to the namespace or setup a sync service that will keep those in sync accross the namespaces. Syncing the secret is a more sustainable way to build out the cluster.
1
2
3
4
5
6
7
8
9
# Create roles and service accounts for the sync service
kubectl apply -f https://raw.githubusercontent.com/mittwald/kubernetes-replicator/master/deploy/rbac.yaml
# Create actual deployment for the sync service
kubectl apply -f https://raw.githubusercontent.com/mittwald/kubernetes-replicator/master/deploy/deployment.yaml
kubectl -n cert-manager annotate secret wildcard-thekor replicator.v1.mittwald.de/replicate-to=chirpy

kubectl get secret wildcard-thekor -n cert-manager -o yaml \
  | sed 's/namespace: cert-manager/namespace: chirpy/' \
  | kubectl apply -n chirpy -f -
And finally the deployment and ingress
1
2
kubectl apply -f https://raw.githubusercontent.com/hupratt/kubernetes-the-hard-way/refs/heads/part6a/kubeconfiguration/deploy/chirpy/deployment.yaml
kubectl apply -f https://raw.githubusercontent.com/hupratt/kubernetes-the-hard-way/refs/heads/part6a/kubeconfiguration/deploy/chirpy/ingress.yaml
And there you have it ! A fresh blog waiting to tackle new challenges and geek out on the latest tech. I could of course automate this further with a gitlab runner, CI/CD pipelines and webhooks but it’s good enough for now.
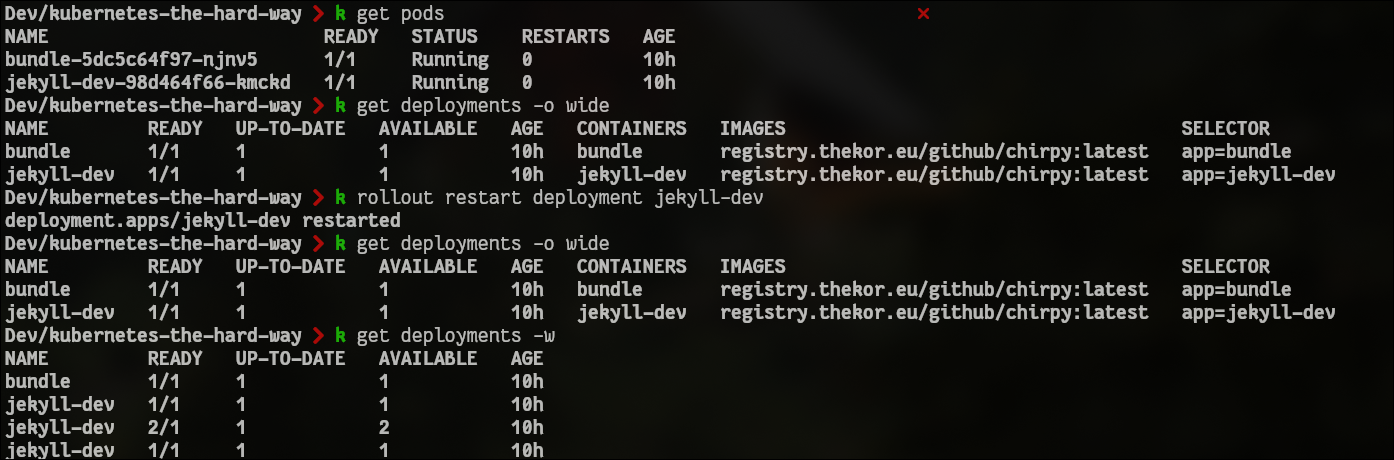
Once you want to rollout a change simply go through the steps below and watch the deployment create a new replicaset with the new version, spin up a new pod, redirect the traffic to the new pod and terminate the old replicaset. And all of this happened seamlessly with no downtime. Absolutely beautiful.
Build a new release
1
docker compose build && docker push registry.thekor.eu/kube/chirpy:latest
And rollout the changes:
Hope you enjoyed this one and I wish you a good evening/afternoon/morning wherever you are.
Cheers