
Introduction
If we had a top #10 in system administration, backups would have to be one of the least sexy topics. That being said you’ll count your blessings once disaster hits and you are able to restore your data with your backups. And trust me it will happen.
I thought I’d share my backup strategy today by outlining the main principles as well as the bash scripts I use to trigger all of it.
Inventory
I have a collection of machines that need to be backed up so ideally I’ll want a tool that will work accross CPU architectures and distributions to avoid having the complexity of maintaining multiple scripts. Let’s list the machines that need to get backed up:
- a laptop running fedora 42, a btrfs file system and an x86_64 bit CPU architecture and a PC running ubuntu 25.04, an ext4 file system and an x86_64 bit CPU architecture
- a raspberry pi that houses everything IOT running debian 12, an ext4 file system and an ARM 64 bit CPU architecture (aarch64)
- proxmox servers with ext4 and LVM file systems and an x86_64 bit CPU architecture
- Windows and Linux VMs running on those proxmox servers
- multiple VMs on hetzner running ubuntu server 22.04 LTS, an ext4 file system and an x86_64 bit CPU architecture
Strategy
In complex systems you need a disaster recovery plan and a tool to manage the dependencies between backups to make sure that they don’t impair the production by limiting the bandwidth allocated to that task. Since I don’t have that kind of problems at home I’ll opt with a simple bash script and a cronjob.
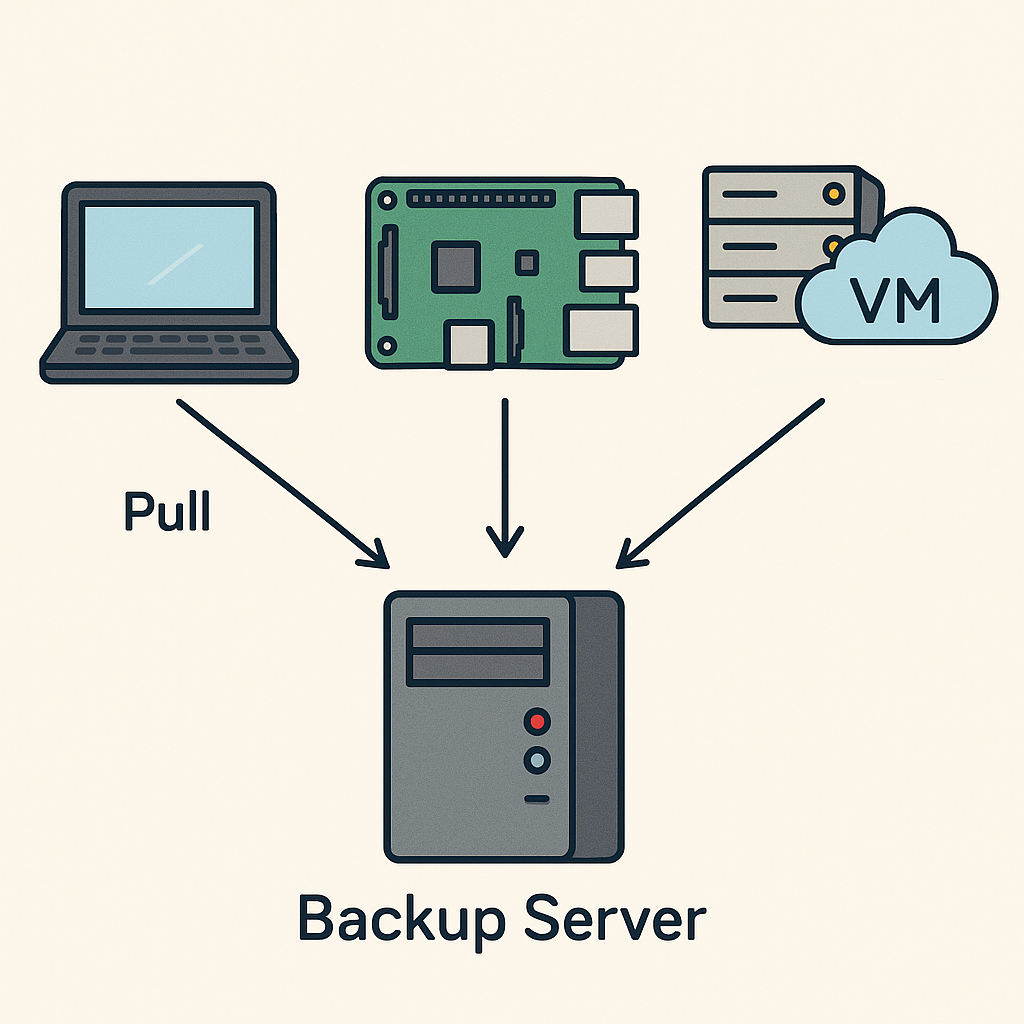
Good practice dictates that the agent who triggers backups needs to be external to your systems and have the least permissions possible. In a zero trust environment, if your main system gets compromised by having this external trigger/agent you avoid losing your backups because the attacker won’t have access to it.
Since we are backing up data across the internet we will set up end to end encryption with TLS and encapsulate that traffic within a VPN tunnel.
The 3-2-1 backup method tells us we need 3 copies of our data, one is on our production data and the other two are housed in two bare metal which in our case are proxmox backup servers.
The backups are encrypted so that if I ever sell or throw away my drives no one would be able to recover anything from them without the private key.
To avoid the hassle of having two backups running at the same time because of our two backup servers I have opted with one master that actually triggers all of the backup scripts and an hourly sync to the secondary proxmox backup server based on the master’s data. The secondary sync is triggered by the proxmox backup server over the web UI
Implementation
1. the laptop and the PC
I’ll eventually run fedora on both my PC and laptop so that I can use btrfs snapshots to send and recover data. The advantage of using that tool is that it’s faster than other simpler tools like rsync. Judging by the amount of data I change, and since I’ll be doing incrementals every week I’ll settle with rsync for now.
1
2
3
4
5
6
7

user@backupserver:$ nano /etc/crontab

(...)

@reboot root sleep 1800 && /root/rsync_laptop.sh
In order for this to work you’ll need to install rsync on both ends and set up an ssh alias so that ssh laptop resolves to the right IP address, the right SSH key and the right user. The configuration file for the aliases is typically stored in ~/.ssh/config. If you’re using jump hosts you can tell your ssh agent to proxy your public key so that you don’t need to copy over an ssh key on the jump server as well.
1
2
3
4
5
6
7
8
9
10
11
12

user@backupserver:$ nano rsync_laptop.sh
#!/bin/bash
# z compresses so that the transfer goes faster, it doesnt actually compress anything
# a does recursive copy and keeps meta data, permissions
# v is for verbose
# --delete removes remote files that were deleted locally
rsync -avz --delete laptop:/home /raid/master >> /tmp/transfer.log 2>&1
rsync -avz --delete laptop:/etc /raid/master >> /tmp/transfer.log 2>&1
rsync -avz --delete laptop:/var /raid/master >> /tmp/transfer.log 2>&1
rsync -avz --delete laptop:/root /raid/master >> /tmp/transfer.log 2>&1
Even though it looks simple and good enough there is one problem. How do you know that the backup is done? How long did they take? At what time did they start and end? Do you want to have to log in to your two servers and look at all the logs? I didn’t think so. Since we are already using grafana to monitor our infrastructure let’s configure prometheus’ pushgateway and add it to our prometheus collector. It’s much simpler to trigger that information through webhooks as opposed to trying to set up a script that configures a postfix mail transfer agent on all our machines. The authorization is handled by our network security. If you’re in the right VLAN you can trigger the REST api.
1
2
3
4
5
6
7
8
9
10
11
12
13
14
15
16
17
18
19
20
21
22
23
24
25
26
27
28
29
30
31
32
33
34
35
36
37
38
39
40
41
42
43
44
45
46
47
48
49
50
51
52
53
54
55
56
57
58

user@backupserver:$ nano rsync_laptop.sh
#!/bin/bash


PUSHGATEWAY_URL="https://pushgateway.example.com"
JOB_NAME="laptop-backup"
INSTANCE="laptop-$(hostname)"
backup_success=1

# Push all metrics for a single rsync target
push_metrics_grouped() {
  local label=$1       # e.g., "home"
  local success=$2
  local start_time=$3
  local end_time=$4
  local duration=$5

  local labels="storage=\"$label\""

  cat <<EOF | curl --silent --show-error --fail --data-binary @- \
    "$PUSHGATEWAY_URL/metrics/job/$JOB_NAME/instance/$INSTANCE/storage/$label"
laptop_success{$labels} $success
laptop_start_time{$labels} $start_time
laptop_end_time{$labels} $end_time
laptop_duration_seconds{$labels} $duration
EOF
}

# Run rsync with metric tracking
#z compresses so that the transfer goes faster, it doesnt actually compress anything
#a does recursive copy and keeps meta data, permissions
#v is for verbose
#--delete removes remote files that were deleted locally
run_backup() {
  local remote_path=$1
  local label=$2

  local start_time=$(date +%s)
  if rsync -avz --delete "laptop:$remote_path" "/raid/master"; then
    success=1
  else
    success=0
    backup_success=0
  fi

  local end_time=$(date +%s)
  local duration=$((end_time - start_time))

  push_metrics_grouped "$label" "$success" "$start_time" "$end_time" "$duration"
}

# Run backups
run_backup "/home" "home"
run_backup "/etc" "etc"
run_backup "/var" "var"
run_backup "/root" "root"
This is how it would look like on the prometheus gateway endpoint:
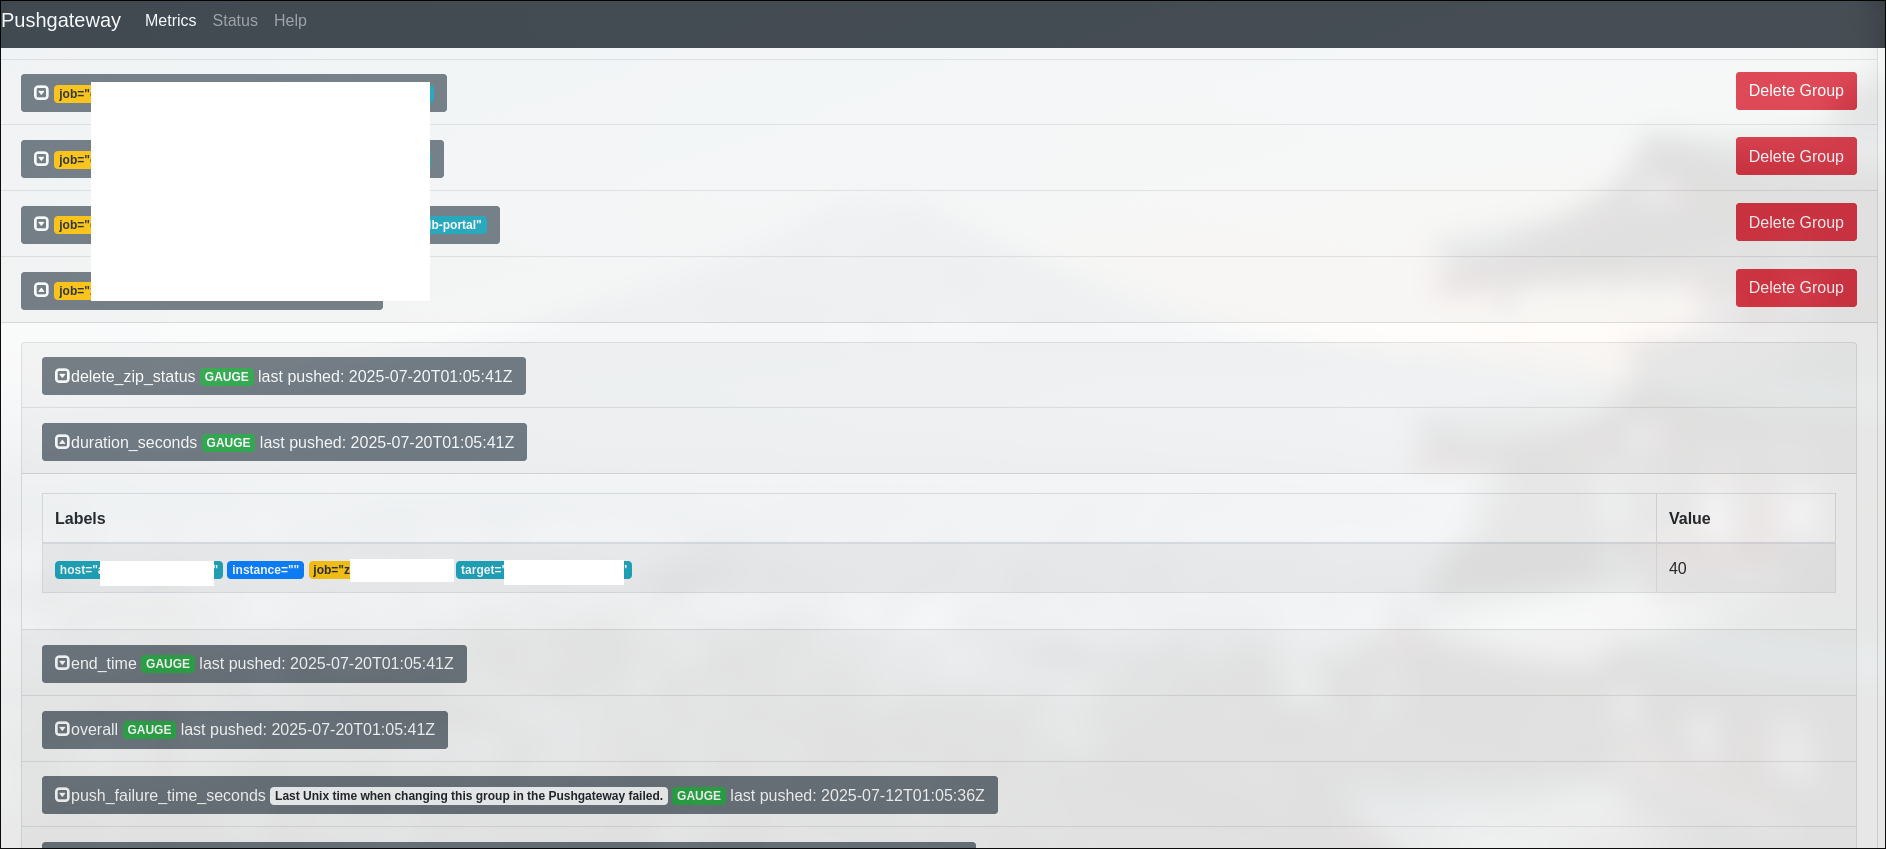
I can now display the backup results on grafana and set up an alert for it in case it fails. Search for this metric “laptop_success” in your prometheus database and it will appear on the grafana explorer.
2. The raspberry pi
Since the raspberry pi is running debian I thought at first I could use the proxmox backup client and push the directories that I need into the proxmox backup server. I couldn’t get it to work so I simply modified the prvious script to save the data over rsync instead.
3. proxmox servers with ext4 and LVM file systems and an x86_64 bit CPU architecture
Proxmox servers come with the proxmox backup client as well as other useful tools like zfs-utils. Setting up the script on the backup server is rather simple.
The pre-requisites are:
- We’ll need a user with the least privileges that can trigger backups and prunes on the proxmox backup server first: manager@pbs
- A datastore to keep those backups let’s call it “proxmox-nodes”
- No need to setup a namespace, we’ll push our backups to the root. The backups will have the hostname as their name so there won’t be any confusion
The tasks above can easily achieved over the web administration UI
1
2
3
4
5
6
7
8
9

user@backupserver:$ nano pbs_backup.sh
#!/bin/bash

PBS_PASSWORD='password'
export PBS_PASSWORD

proxmox-backup-client login --repository manager@pbs@pbs.example.com:443:proxmox-nodes
proxmox-backup-client backup var.pxar:/var etc.pxar:/etc root.pxar:/root --repository pbs.example.com:443:proxmox-nodes --include-dev /etc/pve
Simple and straight to the point. Since we setup a push gateway for our backup metrics earlier, we’ll want to wrap our script above with some extra capabilities
1
2
3
4
5
6
7
8
9
10
11
12
13
14
15
16
17
18
19
20
21
22
23
24
25
26
27
28
29
30
31
32
33
34
35
36
37
38
39
40
41
42
43
44
45
46
47
48

user@backupserver:$ nano pbs_backup.sh
#!/bin/bash

PUSHGATEWAY_URL="https://pushgateway.example.com"
JOB_NAME="node-backup"
PBS_PASSWORD='password'
export PBS_PASSWORD

# Function to push metric to Prometheus Pushgateway
push_metrics() {
  local metric_text="$1"
  # Push metric using curl (replace job and instance labels as needed)
  echo "$metric_text" | curl --data-binary @- \
    "$PUSHGATEWAY_URL/metrics/job/$JOB_NAME/instance/$(hostname)"
}

# Record start time
start_time=$(date +%s)

# Optional: push start time early if you want to track it even if the script crashes
push_metrics "nodebackup_start_time $start_time"

proxmox-backup-client login --repository pbs.example.com:443:proxmox-nodes

if proxmox-backup-client backup var.pxar:/var etc.pxar:/etc root.pxar:/root --repository pbs.example.com:443:proxmox-nodes --include-dev /etc/pve; then
  echo "Backup succeeded."
  backup_success=1
else
  echo "Backup FAILED!"
  backup_success=0
fi

# Record end time and duration
end_time=$(date +%s)
duration=$((end_time - start_time))

# Prepare metrics
metrics=$(cat <<EOF
nodebackup_start_time $start_time
nodebackup_end_time $end_time
nodebackup_duration_seconds $duration
nodebackup_success $backup_success
EOF
)

# Push metrics
push_metrics "$metrics"
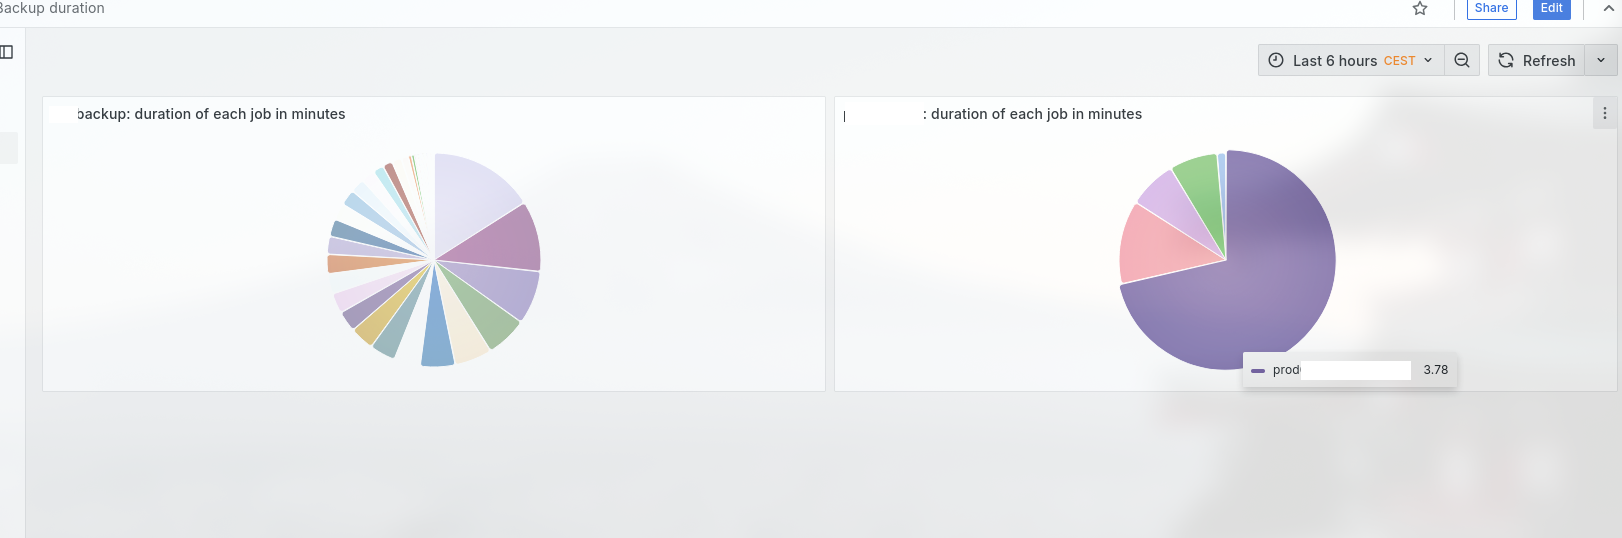
Now that we have two jobs we can set up a small dashboard that summarizes the backup duration for both jobs: node-backup and laptop-backup. This will help us uncover some insights into how long we should expect each job takes
4. Windows and Linux VMs running on those proxmox servers
If you’re like me and don’t have many VMs perhaps this trigger would be enough
1
vzdump 100 101 102 --storage pbs-main --mode snapshot --compress zstd
The storage is simply the name of your storage on the proxmox UI.
The script above is nice and simple but then again, how do we handle the errors? Although a bit convoluted I’ve set up this script that will look at the machines that are running and back them up. It’s a bit more complex but it has the advantage of being future proof and I don’t need to worry about it in case I decide to create new VMs or containers or delete any VMs.
1
2
3
4
5
6
7
8
9
10
11
12
13
14
15
16
17
18
19
20
21
22
23
24
25
26
27
28
29
30
31
32
33
34
35
36
37
38
39
40
41
42
43
44
45
46
47
48
49
50
51
52
53
54
55
56
57
58
59
60
61
62
63
64
65
66
67
68
69
70
71
72
73
74
75
76
77
78
79
80

user@backupserver:$ nano pbs_backup.sh
#!/bin/bash

PBS_STORAGE="pbs-main"
MODE="snapshot"
COMPRESS="zstd"
PUSHGATEWAY_URL="https://pushgateway.example.com"
JOB_NAME="vmbackup"

# Function to push metric to Prometheus Pushgateway
push_metric() {
  local metric_name=$1
  local metric_value=$2
  local labels=$3

  # Compose metric text
  metric_text="$metric_name{$labels} $metric_value"

  # Push metric using curl (replace job and instance labels as needed)
  echo "$metric_text" | curl --data-binary @- \
    "$PUSHGATEWAY_URL/metrics/job/$JOB_NAME/instance/$(hostname)$3"
}

push_metrics_grouped() {
  local entity_type=$1       # "vm" or "container"
  local entity_id=$2         # VMID or CTID
  local success=$3           # 1 or 0
  local start_time=$4        # Epoch seconds
  local end_time=$5          # Epoch seconds
  local duration=$6          # Seconds

  local labels="$entity_type=\"$entity_id\""

  cat <<EOF | curl --data-binary @- \
    "$PUSHGATEWAY_URL/metrics/job/$JOB_NAME/instance/$(hostname)/$entity_type/$entity_id"
${entity_type}backup_success{$labels} $success
${entity_type}backup_start_time{$labels} $start_time
${entity_type}backup_end_time{$labels} $end_time
${entity_type}backup_duration_seconds{$labels} $duration
EOF
}

backup_success=1

# Backup all VMs
for VMID in $(qm list | awk '$3 == "running" {print $1}'); do
  echo "Backing up VM $VMID to PBS..."
  start_time=$(date +%s)
  if vzdump $VMID --storage $PBS_STORAGE --mode $MODE --compress $COMPRESS; then
    echo "Backup of VM $VMID succeeded."
    success=1
  else
    echo "Backup of VM $VMID FAILED!"
    success=0
    backup_success=0
  fi
  end_time=$(date +%s)
  duration=$((end_time - start_time))
  push_metrics_grouped "vm" "$VMID" "$success" "$start_time" "$end_time" "$duration"
done

echo "Starting container backup"

for CTID in $(pct list | awk '$2 == "running" {print $1}'); do
  echo "Backing up container $CTID to PBS..."
  start_time=$(date +%s)
  if vzdump $CTID --storage $PBS_STORAGE --mode $MODE --compress $COMPRESS; then
    echo "Backup of container $CTID succeeded."
    success=1
  else
    echo "Backup of container $CTID FAILED!"
    success=0
    backup_success=0
  fi
  end_time=$(date +%s)
  duration=$((end_time - start_time))
  push_metrics_grouped "container" "$CTID" "$success" "$start_time" "$end_time" "$duration"
done
5. 2 VMs on hetzner running ubuntu server 22.04 LTS
Both machines are running supported CPU architectures so I was able to reuse the script I used earlier in number 3: “proxmox servers with ext4 and LVM file systems and an x86_64 bit CPU architecture”
The official proxmox backup client can be downloaded by running this command:
1
2

user@backupserver:$ apt update && apt install proxmox-backup-client
or you can download the binaries directly from here:
1
2
3
4

user@backupserver:$ wget http://download.proxmox.com/debian/pbs-client/dists/bullseye/main/binary-amd64/proxmox-backup-client_2.4.7-1_amd64.deb
user@backupserver:$ dpkg -i proxmox-backup-client_2.4.7-1_amd64.deb
Here’s a quick draft of what I intend to set up for the networking:
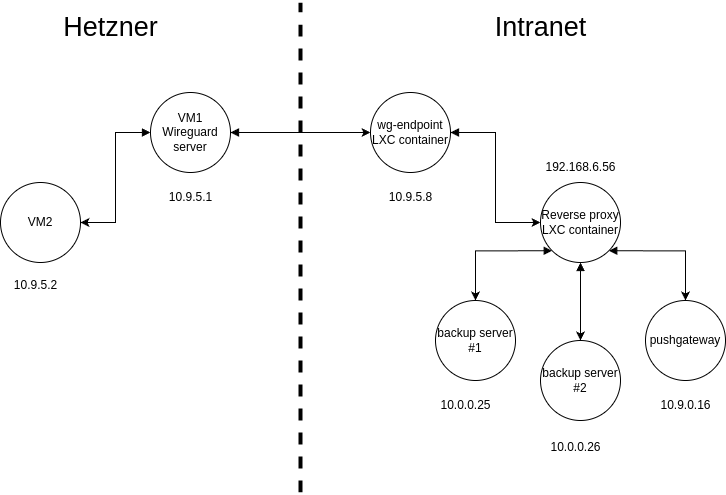
Even though the communication between the hetzner VM and the backup server is end to end encrypted our pushgateway has no authentication so I don’t want to set up a DNS record for it.
I was guided by this wonderful guide that I found on the internet in order to set up a site-to-site split tunnel with wireguard. The routing from the two hetzner machines is handled easily by wireguard through the allowed hosts parameter. The only hurdle was NAT-ing the traffic back to our VMs. Without this NAT configuration I wouldn’t be able to push my web hooks to the pushgateway.
As I don’t have a Layer 3 switch at hetzner for budget reasons I can’t set up any dynamic routing between my firewall and the 2 VPS machines. I could have added the routes manually on the pushgateway server but I would have to make those routing changes persistent and I’d forget about it eventually so I settled with setting up static routes on the firewall itself
In pfsense simply navigate to System>Routing and create a new “gateway”
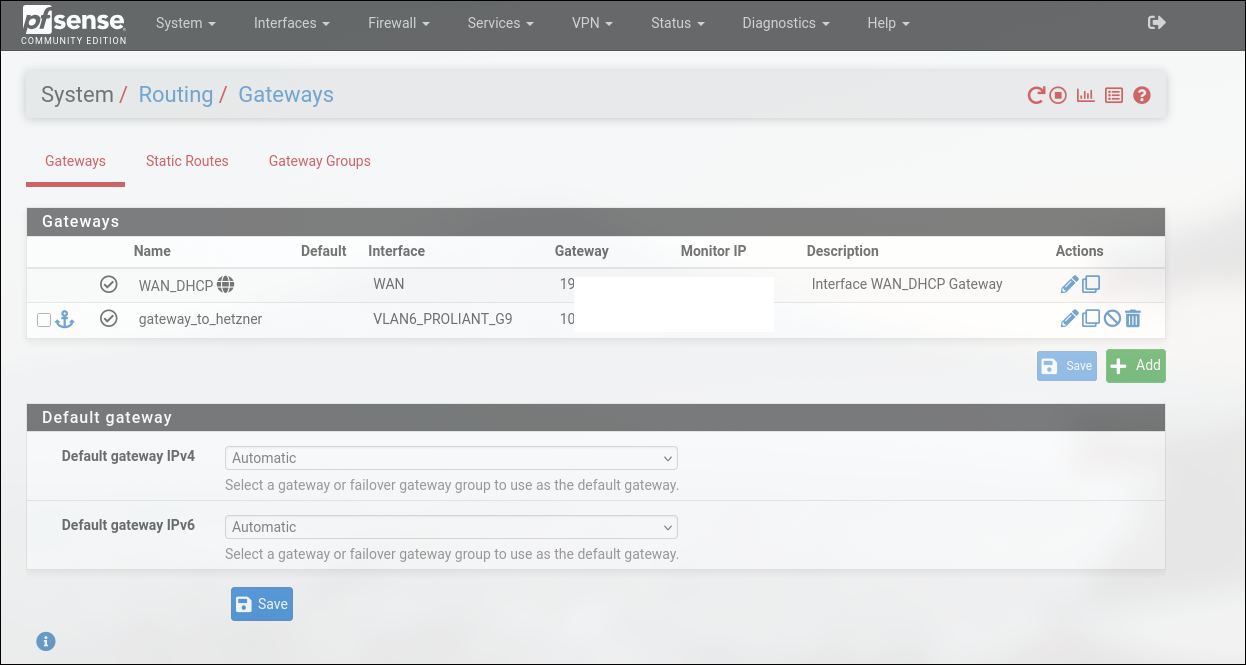
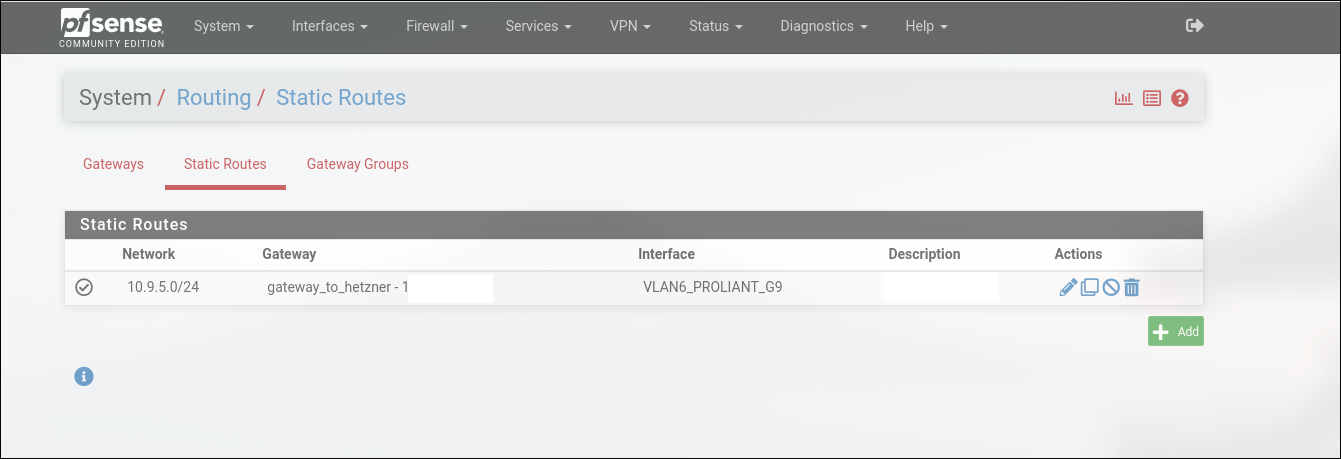
You’ll want to specify the next hop i.e. 192.168.6.56 address for the router to know where to relay the traffic back to the originator. Now we simply need to add the static route to our tunnel’s network in the System>Routing>Static routes menu
Conclusion
And there we have it. A fully automated backup service that notifies us in case anything goes wrong. It’s a first version so it has room for improvement by triggering a shutdown of our proxmox backup servers once everything is done for example but that’s a nice to have, not a feature for a first version of our system. I am also not following the 3-2-1 backup strategy so I’ll see what I can do in order to house those backups on a remote location.
Hope you enjoyed the short read and I’ll see you on the next one